Garlic Herb Grilled Chicken Breast: An Easy, Juicy Recipe Perfect for Summer BBQs
There’s nothing like firing up the grill when the weather warms up. The scent of sizzling meat, the crisp char lines, and the joy of sharing a meal outdoors—these are the hallmarks of summer. If you want a dish that’s both impressive and effortless, this Garlic Herb Grilled Chicken Breast is a must‑try. It starts with a simple marinade of fresh garlic, fragrant herbs, olive oil, and lemon that infuses the chicken with flavor and keeps it incredibly moist. In no time, you’ll have tender, juicy chicken that’s perfect for any gathering, from casual weeknight dinners to backyard parties. In this guide, we’ll walk through every step, share secret tips for perfect results, and suggest creative ways to serve and store your leftovers. Get ready to become the grill master of your neighborhood with this foolproof recipe.
Why You’ll Love This Garlic Herb Grilled Chicken Breast
The beauty of this recipe lies in its simplicity and versatility. The marinade requires just a handful of pantry staples and only 30 minutes of active time. The chicken turns out juicy every time because the oil and lemon create a barrier that locks in moisture while the herbs add layers of flavor. It’s also adaptable—swap rosemary for oregano, add a pinch of chili flakes for heat, or use chicken thighs if you prefer. Plus, it’s a healthy protein source low in carbs and high in lean muscle‑building nutrients. Whether you’re feeding a family or hosting a crowd, this dish delivers consistent, mouthwatering results with minimal cleanup.
Ingredients
- 4 boneless, skinless chicken breasts (6‑8 oz each)
- ¼ cup extra virgin olive oil
- 4 cloves garlic, minced
- 1 tablespoon fresh rosemary, finely chopped
- 1 tablespoon fresh thyme, finely chopped
- 2 tablespoons fresh parsley, chopped
- Juice of 1 lemon (about 3 tablespoons)
- 1 teaspoon kosher salt
- ½ teaspoon freshly ground black pepper
- Optional: ½ teaspoon smoked paprika
For the best flavor, choose high‑quality olive oil and fresh herbs. If fresh herbs aren’t available, dried herbs can be used—reduce the amount to one‑third because dried herbs are more potent. Fresh lemon juice is essential; bottled versions often have additives that alter taste. Kosher salt is preferred because it sticks to the chicken and doesn’t contain anti‑caking agents. Smoked paprika adds a subtle smokiness that complements the grill, but you can omit it if you prefer a brighter herb profile.
Step-by-Step Instructions
Step 1: Prepare the Marinade
In a small mixing bowl, whisk together the olive oil, minced garlic, rosemary, thyme, parsley, lemon juice, salt, pepper, and smoked paprika (if using). Whisking until smooth ensures the ingredients are well combined and the garlic and herbs are evenly distributed. The acid from the lemon juice will start to tenderize the chicken, while the oil helps to carry the fat‑soluble flavors of the herbs and garlic. Set the marinade aside while you prepare the chicken.
Step 2: Marinate the Chicken
Place the chicken breasts in a large resealable plastic bag or a shallow glass or ceramic dish. Pour the marinade over the chicken, making sure each piece is fully coated. If using a bag, press out as much air as possible before sealing. Refrigerate for at least 30 minutes; for deeper flavor, aim for 2‑4 hours. You can marinate overnight if you reduce the lemon juice slightly, but avoid more than 12 hours because the acid can cause the texture to become mushy. About 20 minutes before cooking, take the chicken out of the fridge and let it rest on the counter. Allowing the chicken to reach room temperature promotes even cooking and prevents the grill from cooling down drastically when the cold meat is added.
Step 3: Preheat the Grill and Oil the Grates
Preheat your grill to medium‑high heat, around 400‑450°F (200‑230°C). For a charcoal grill, light the coals and spread them out evenly. For a gas grill, set all burners to high and close the lid for about 10‑15 minutes. While the grill heats, use a stiff wire brush to clean the cooking grates thoroughly. Once hot, lightly oil the grates: fold a paper towel, dip it in olive oil, and, using long tongs, rub the towel over the grates. This creates a non‑stick surface and helps the chicken develop those coveted grill marks. Oil the grates right before placing the chicken to maintain temperature and avoid flare‑ups.
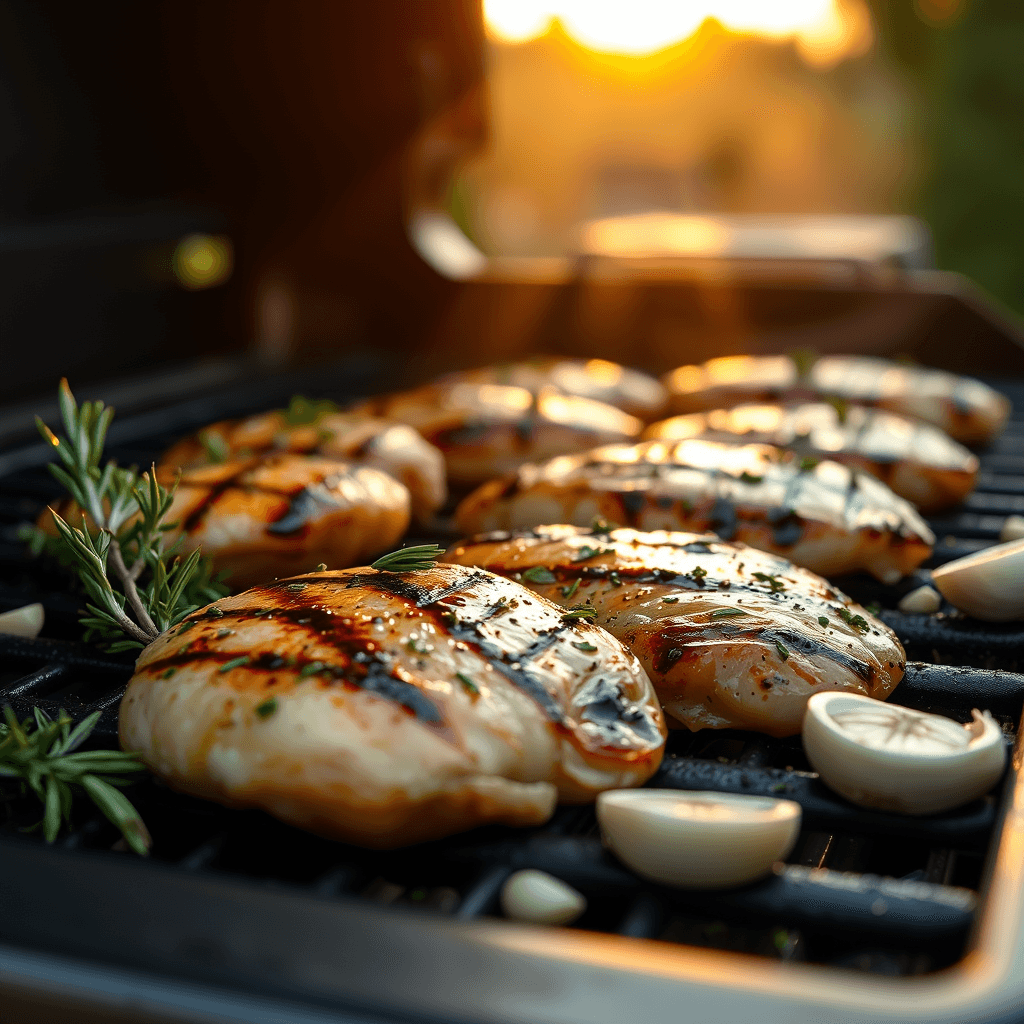
Step 4: Grill the Chicken Breasts
Place the marinated breasts on the grill grates at a diagonal angle to create diamond‑shaped marks. Close the lid and cook for 6‑7 minutes on the first side. You should see clear grill lines and the edges turning opaque. Flip the chicken with tongs—never a fork—to keep the juices inside. Cook the second side for 5‑6 minutes, or until the internal temperature reaches 165°F (74°C). Use an instant‑read thermometer inserted into the thickest part. If the chicken is browning too quickly, move it to a cooler part of the grill to finish cooking over indirect heat. Resist the temptation to press down; pressing squeezes out the juices and leads to dry meat.
Step 5: Rest and Serve
Transfer the grilled chicken to a clean plate or cutting board. Loosely tent with aluminum foil and let it rest for 5‑10 minutes. This resting period is crucial; it allows the muscle fibers to relax and reabsorb the juices, resulting in moist, succulent meat. After resting, slice the chicken across the grain or serve it whole. It pairs excellently with grilled vegetables, a crisp salad, or in wraps. Drizzle any accumulated juices over the top for extra flavor. Leftovers can be chilled and used in salads, sandwiches, or bowls throughout the week.
Pro Tips for Juicy Grilled Chicken Every Time
- Pat the chicken breasts completely dry with paper towels before marinating. Any surface moisture will steam the meat and prevent a good sear. Starting with dry chicken ensures the marinade clings and the grill makes direct contact for those perfect char marks.
- Bring the chicken to room temperature before grilling. Cold meat lowers the grill’s surface temperature, leading to uneven cooking and longer grill times. Let it sit out for about 20 minutes after marinating; you’ll notice more consistent results and juicier chicken.
- Use a reliable meat thermometer. The USDA says 165°F is safe, but many chefs pull the chicken at 160°F and let carryover heat bring it up to temperature while resting. This prevents over‑cooking and keeps the meat tender. An instant‑read thermometer gives a quick, accurate reading.
- Oil the grill grates while they are hot and after cleaning. Dip a folded paper towel in oil, grasp it with tongs, and rub it across the grates. This non‑stick step prevents the chicken from sticking and helps achieve attractive grill lines without tearing the skin.
- Flip the chicken only once. Frequent flipping interrupts the searing process and can cause juices to escape. Let the first side cook undisturbed until it releases easily from the grates, then flip and finish.
- Always let the chicken rest after grilling. Cutting into it immediately will cause the juices to run out, leaving the meat less moist. Tent with foil and wait 5‑10 minutes before slicing. This small step makes a big difference in juiciness.
Serving Suggestions
These garlic herb chicken breasts are incredibly versatile. Serve them sliced over a fresh green salad with a lemon vinaigrette, or stuff them into a whole‑wheat pita with cucumber sauce and tomato for a Mediterranean sandwich. They also make a perfect main dish alongside grilled vegetables like zucchini, bell peppers, and asparagus. For a light, low‑carb meal, pair with cauliflower rice or zucchini noodles. Leftovers are excellent in tacos, soups, or as a protein topping for grain bowls. The herb‑garlic flavor pairs beautifully with tangy condiments such as tzatziki, chimichurri, or a dill‑yogurt sauce.
Storing and Reheating Leftovers
Let the chicken cool completely, then place it in an airtight container in the refrigerator for up to 4 days. To keep it from drying out, add a drizzle of olive oil, broth, or a bit of the pan juices before sealing. When reheating, avoid the microwave if possible, as it can make the meat tough. Instead, warm gently in a skillet over low heat with a splash of liquid and cover to steam, or reheat on the grill for a few minutes on each side. You can also enjoy the chicken cold in salads or sandwiches—it’s just as delicious.
Frequently Asked Questions
Can I use dried herbs instead of fresh?
Yes. Substitute dried herbs at one‑third the amount because they are more concentrated. For example, 1 tablespoon fresh rosemary equals 1 teaspoon dried. Add dried herbs directly to the marinade; they will rehydrate slightly in the oil and lemon juice.
What is the minimum marinating time?
While 30 minutes is the absolute minimum to infuse some flavor, we recommend at least 2 hours for the best results. If you’re short on time, you can even let the chicken sit in the marinade at room temperature for 30 minutes, but never exceed 12 hours in the fridge due to the lemon’s acidity.
How do I know when the chicken is done without a thermometer?
Make a small cut in the thickest part; the meat should be white throughout with clear juices. Another indicator is firmness—when pressed with a finger, cooked chicken feels firm but not hard. However, a thermometer is the most reliable method to ensure safety and avoid over‑cooking.
Can I grill chicken on an indoor grill or pan?
Yes. A cast‑iron grill pan or an electric indoor grill works well. Preheat on medium‑high, oil the ridges, and grill the chicken as you would outdoors. You’ll get nice marks, though the smoky flavor will be less pronounced. Make sure your kitchen is well‑ventilated.
Conclusion
This Garlic Herb Grilled Chicken Breast recipe is a reliable, crowd‑pleasing favorite that you’ll return to all summer long. With its simple ingredients and easy technique, you can achieve juicy, flavorful chicken every time. Don’t be afraid to experiment with herbs and serving ideas to make it your own. Light the grill, follow the steps, and enjoy the delicious results with family and friends.